Scheduled jobs
Scheduled jobs let your agents run tasks automatically — on a recurring schedule or at a specific time — without you having to be there. This guide covers how to create, manage, and review your jobs.
A job tells your agent what to do and when to do it. Each time a job runs it creates an execution — a record of what happened and whether it succeeded.
For a walkthrough on getting started, check out the Making your agent work for you with scheduling guide.
Creating a job
Jobs are created from the Scheduled area of your workspace. Once saved, the job will run automatically according to the schedule you set.
- Go to Scheduled in the workspace navigation.
- Click Create job within the top right corner.
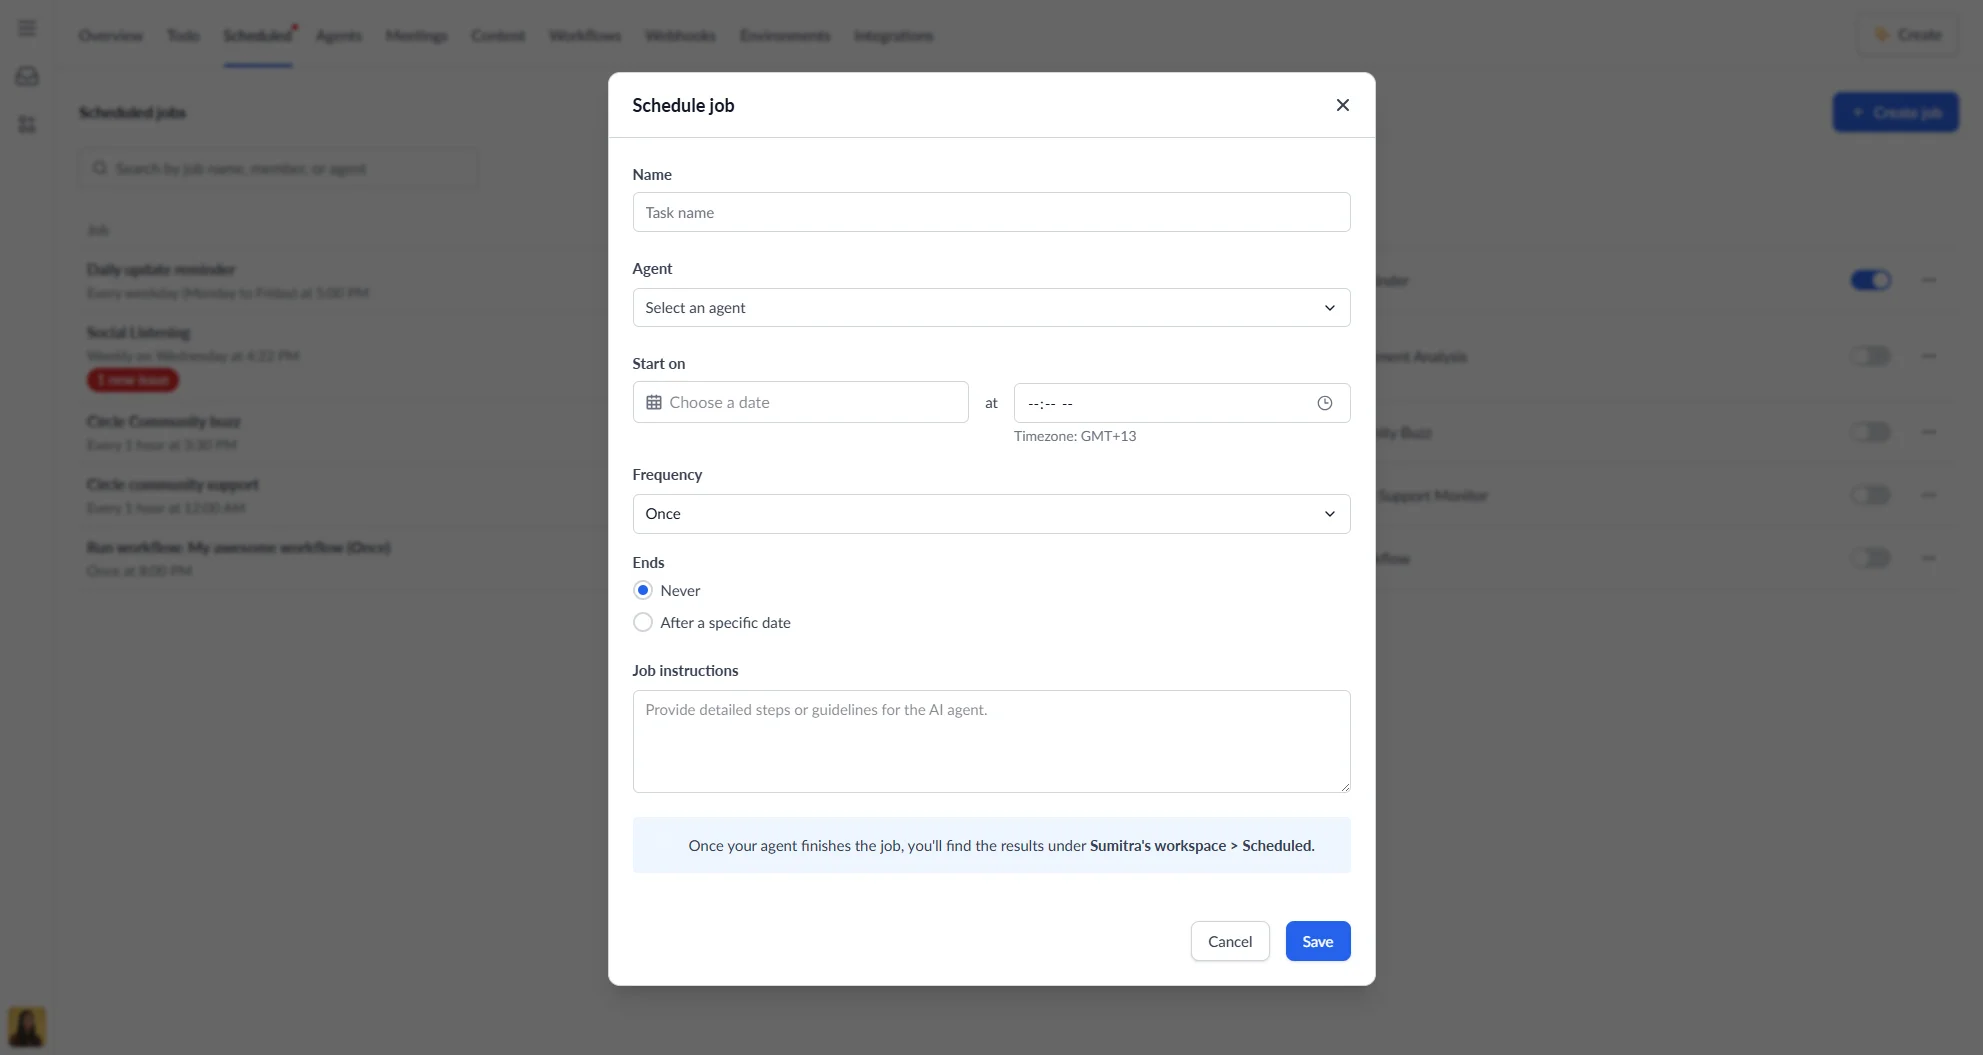
- Fill in the job form and click Save. Refer to the Job form fields below for more information.
Job form fields
Each field in the job form controls a different aspect of how and when your agent runs.
| Field | Description |
|---|---|
| Name | A clear name for the job (max 255 characters) |
| Agent | The agent that will run the job |
| Start on | The date and time the job should first run |
| Frequency | How often the job repeats |
| Ends | Optional end date, or leave as Never to run indefinitely |
| Job instructions | The prompt the agent will follow each time the job runs |
Choosing a frequency
The frequency determines how often your job runs. Choose from a set of common schedules or use Custom to define your own interval.
| Option | Description |
|---|---|
| Once | Runs one time only |
| Daily | Runs every day at the set time |
| Weekly | Runs every week on the same day |
| Weekday | Runs every Monday to Friday |
| Fortnightly | Runs every two weeks on the same day |
| Custom | Set your own interval |
Custom frequency
Custom gives you full control over the schedule when the standard options don’t fit your needs. Selecting Custom reveals additional options:
- Repeat every — choose an interval (1–24) and a unit: Hour, Day, Week, or Month
- Days of the week — if repeating weekly, select which days to run on (at least one required)
- Monthly position — if repeating monthly, choose which occurrence to run on (e.g. the first Tuesday, the third Friday)
Managing jobs
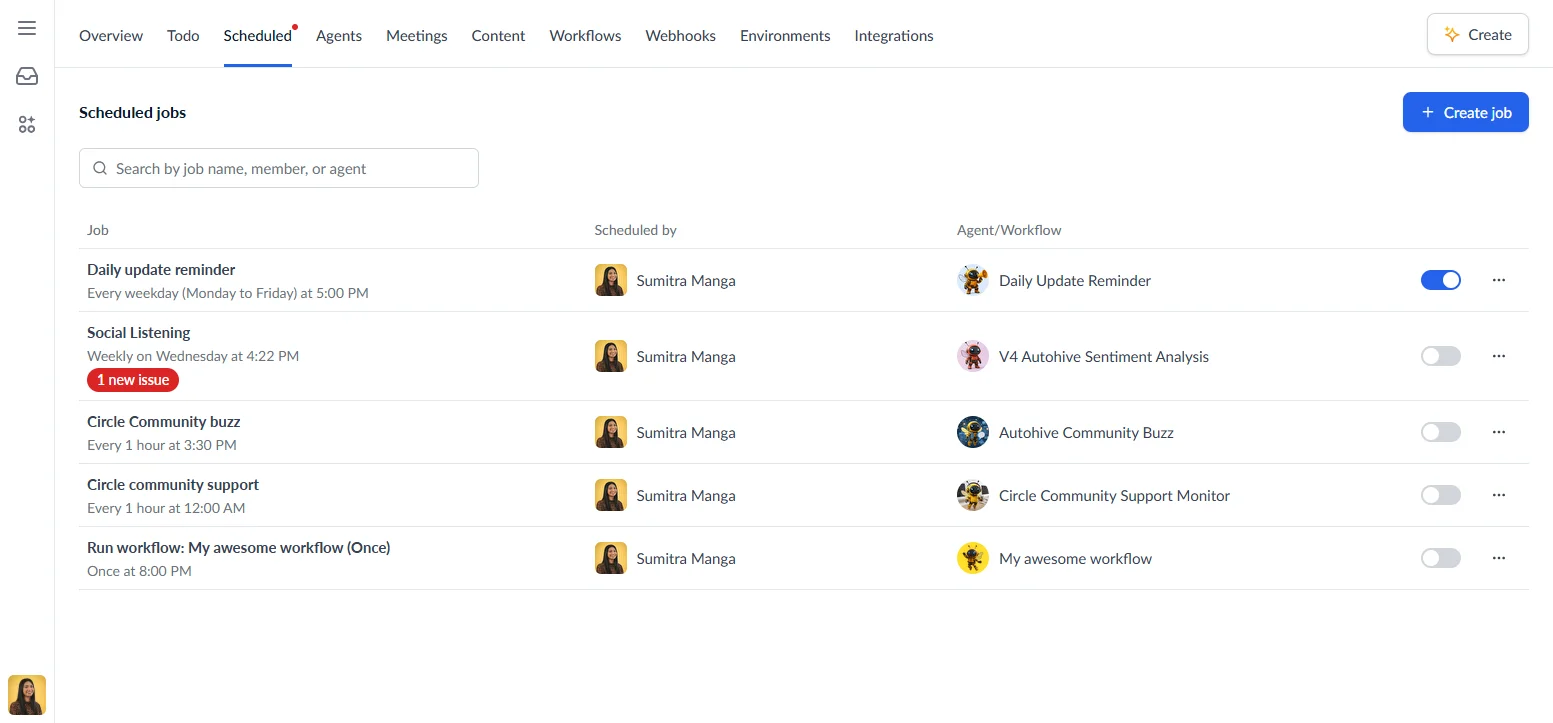
The Scheduled jobs page shows all jobs in your workspace as a table with the following columns:
| Column | Description |
|---|---|
| Job | Job name, schedule description, and a badge showing any failed executions |
| Scheduled by | The member who created the job |
| Agent/Workflow | The agent assigned to the job |
| Actions | Toggle the job on/off and access the options menu |
Use the search bar to filter by job name, member, or agent.
Job actions
Each job has a three-dot options menu for making changes after the job has been created. Click the three-dot menu on any job to:
- Edit — update the job name, agent, schedule, or instructions
- Duplicate — create a copy of the job
- Delete — permanently remove the job
Enabling and disabling jobs
Use the toggle switch on each job row to turn a job on or off without deleting it. Disabled jobs will not run until re-enabled.
Viewing execution history
Each time a scheduled job runs, it creates an execution — a record of that individual run, including when it happened, whether it succeeded, and what the agent produced. A single job can have many executions over its lifetime.
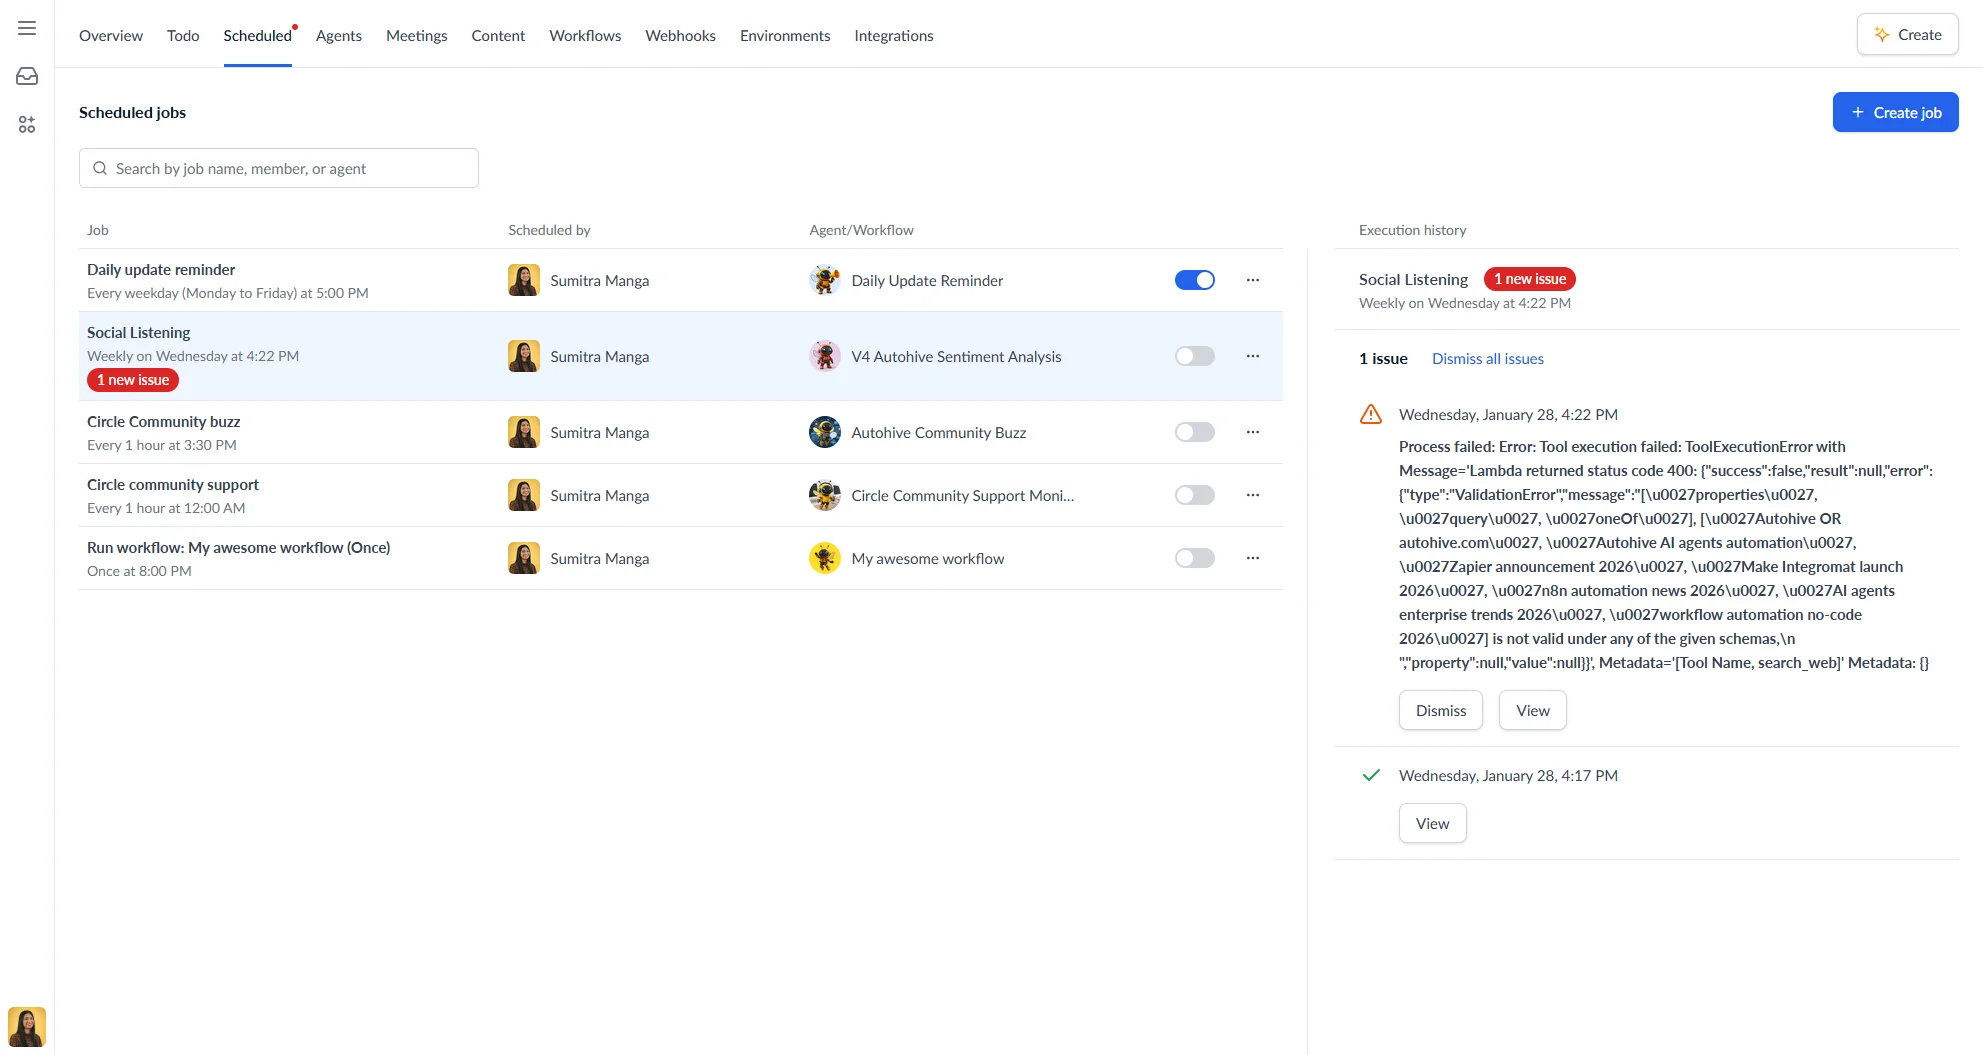
Click any job in the list to open the execution history panel. Each execution shows:
- Date and time it ran
- Status — Succeeded, Failed, or Timed out
- Error message if it failed
For successful executions, click View to open the conversation and see the agent’s output.
Handling failures
When a job fails, a badge appears on the job showing the number of new issues. From the execution history panel you can:
- Click View to read the error and the agent’s response
- Click Dismiss to acknowledge the failure and clear the badge
- Click Dismiss all issues to clear all unacknowledged failures at once
If the assigned agent was deleted, an Assign another agent button will appear, letting you update the job without losing the rest of its configuration.
Where to find job results
When a job completes, the results are saved as a conversation. You can find them under Scheduled in your workspace — click View on any successful execution to open it.
Common issues
| Problem | Why it happens | How to fix |
|---|---|---|
| Job doesn’t start | Job is disabled or timezone mismatch | Check the toggle is on and verify your timezone |
| Job keeps failing | Bad instructions or missing integration | Read the error message, update the instructions or reconnect the integration |
| Jobs overlap | Run time exceeds the interval | Increase the interval or switch to a less frequent schedule |