HubSpot
The Autohive HubSpot integration connects your HubSpot CRM with Autohive’s automation platform, enabling:
- Complete CRM automation - Manage contacts, companies, deals, and tickets through comprehensive CRUD operations across all major CRM objects
- Advanced relationship mapping - Discover and manage complex associations between contacts, companies, deals, tickets, and activities using v4 Associations API
- Notes and engagement tracking - Create, update, and retrieve notes across contacts, companies, and deals for complete interaction history
- Deal pipeline management - Track deals from lead to close with automated stage progression, custom properties, and UTC date handling
- Support ticket operations - Manage support tickets with conversation threading, comment addition, and full ticket lifecycle tracking
- Lists and segmentation - Access marketing lists, export member data with contact details, and manage list memberships for dynamic and manual lists
- Custom properties discovery - Retrieve all available properties including custom fields for contacts, companies, and deals with detailed metadata
- Email communications - Access email conversation history and engagement data for comprehensive customer interaction tracking
- Enterprise integration - OAuth 2.0 authentication, pagination support, intelligent rate limiting, and UTC date formatting for global operations
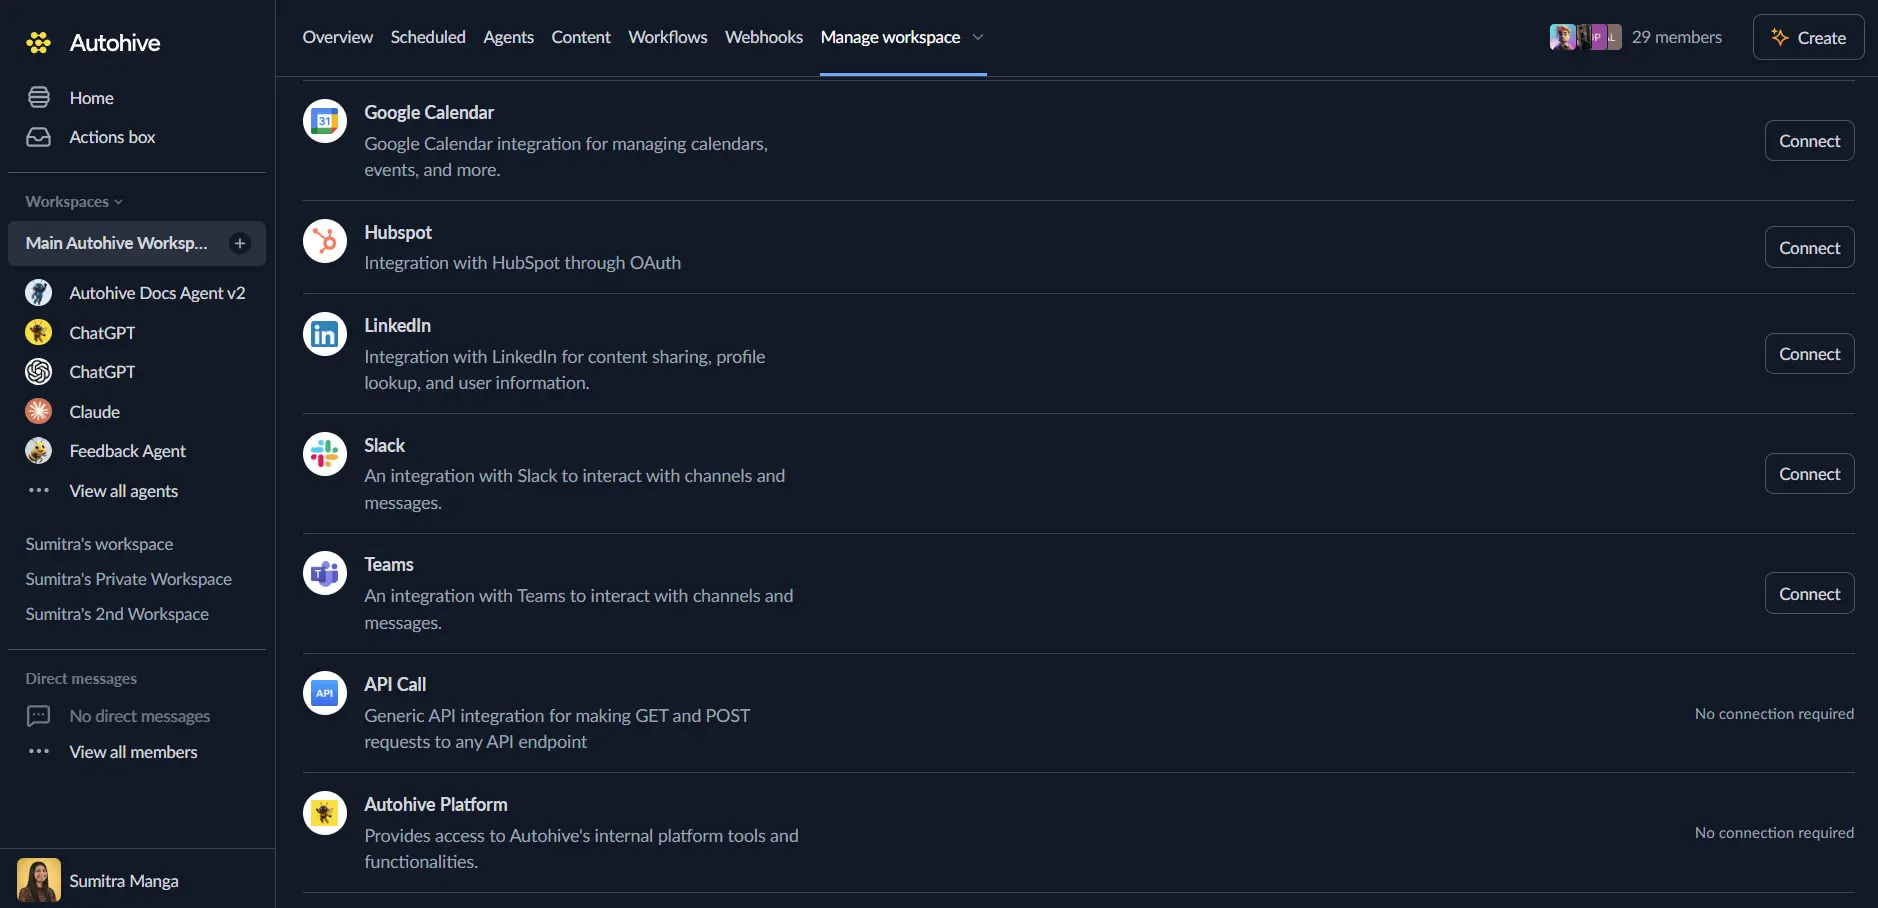
Install the integration
Log in to Autohive and navigate to Your user profile > Connections or Your workspace -> Manage workspace
Locate the HubSpot Integration card and click Connect
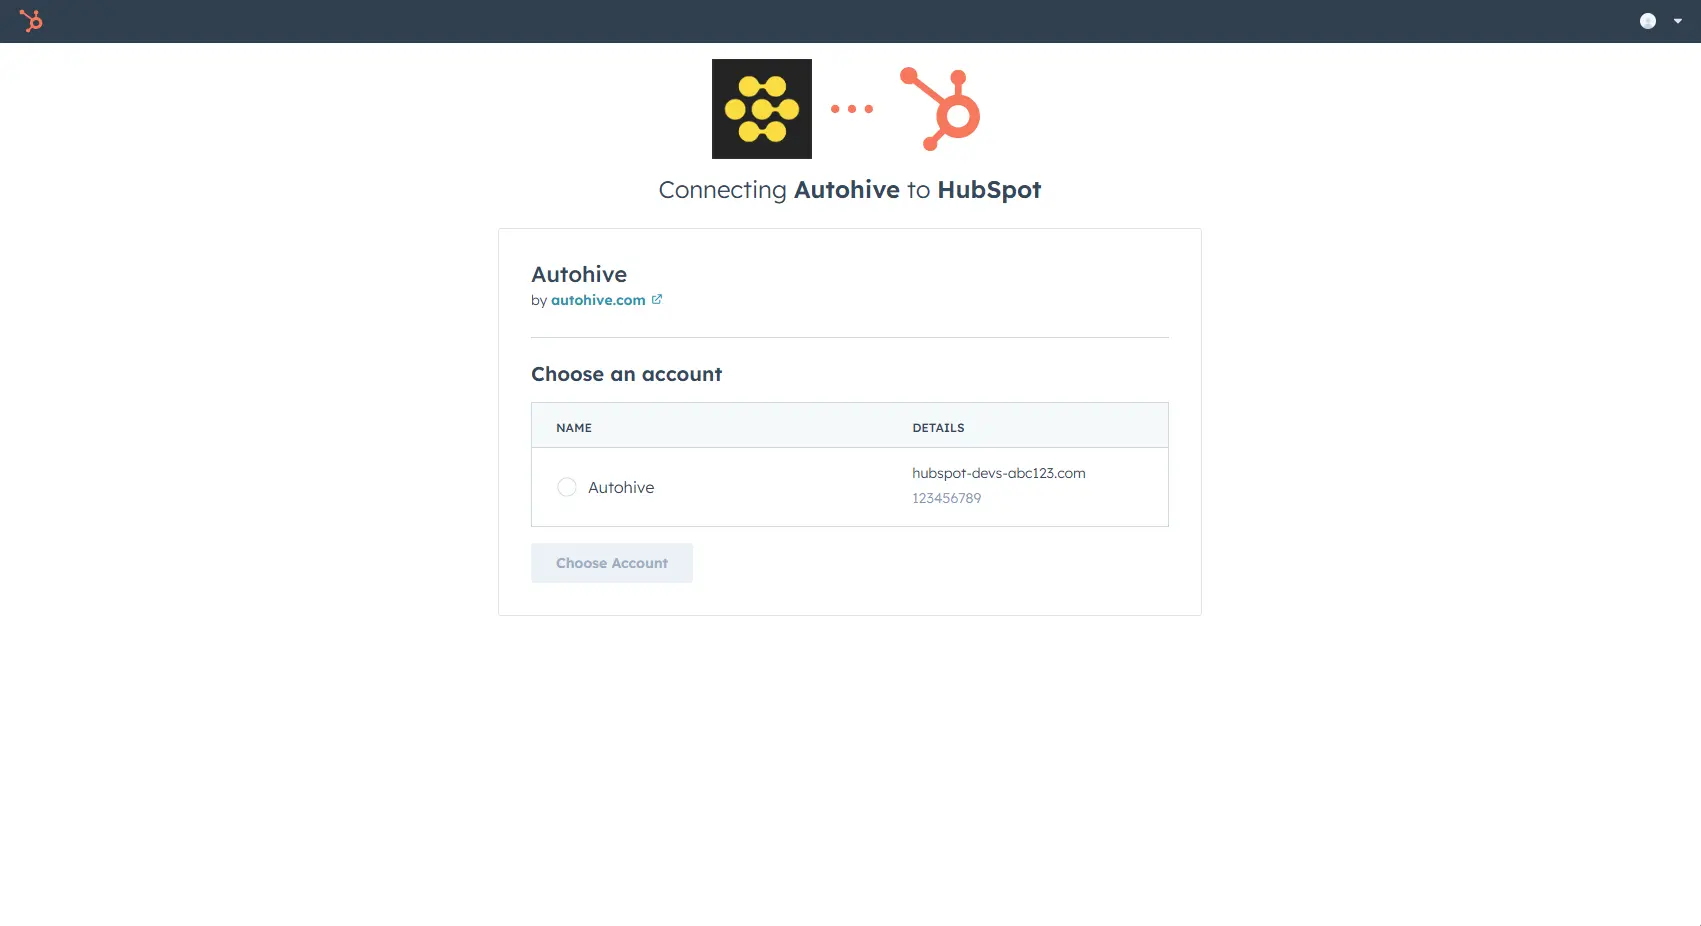
Select your HubSpot account and click Choose Account
Review and approve permissions. Autohive requests access to:
- Contacts: Read and write contact data, properties, and associations
- Companies: Read and write company data, properties, and associations
- Deals: Read and write deal data, pipelines, and custom properties
- Tickets: Read and write ticket data and manage conversations
- Notes: Create, read, update, and delete notes (engagements)
- Lists: Access and manage marketing lists and list memberships
- Owners: Read owner information for assignment and filtering
- Conversations: Read and write conversation threads
- Sales Email: Read sales email engagement data
Ensure you approve all permissions required for the integration to function as expected.
Confirm installation - you’ll be redirected to Autohive with “Connected” status displayed
Use the integration
You can now use the integration with your agents, workflows and scheduled tasks!
- Follow our Create your first agent guide on how to create an agent.
- In the ‘Agent settings’, scroll down to the ‘Add capabilities’ section and turn on the HubSpot capability. You can choose what individual HubSpot capabilites to turn on and off.
- Once the settings have been selected, begin prompting the agent of the workflow you’d like to achieve with Autohive and HubSpot!
Available capabilities
Contact Management
- Create Contact: Add new contacts with detailed profile information including email, name, phone, company, and custom properties
- Get Contact: Retrieve complete contact records with all standard and custom properties
- Update Contact: Modify existing contact information while preserving data relationships and history
- Search Contacts: Find specific contacts using text queries with pagination support up to 100 results
- Get Recent Contacts: Retrieve recently created contacts sorted by creation date for tracking new leads
- Add Contact to List: Add contacts to marketing lists for segmentation and campaign management
- Get Contact Notes: Retrieve all notes associated with a contact for complete interaction history
- Get Contact Emails: Access recent email conversations and engagement data for contacts
- Get Contact Associations: Discover all related objects (companies, deals, tickets, tasks, emails, meetings) using v4 Associations API
- Get Contact Properties: Retrieve all available contact properties including custom fields with detailed metadata
Company Management
- Create Company: Add new companies with comprehensive business information including domain, industry, revenue, and employee count
- Get Company: Retrieve complete company records with all standard and custom properties
- Update Company: Modify company information while maintaining organizational relationships
- Search Companies: Find companies using text queries with pagination and filtering capabilities
- Search Companies by Owner: Find all companies associated with a specific owner by name
- Get Company Notes: Retrieve all notes associated with a company for account history tracking
- Get Company Associations: Discover all related objects (contacts, deals, tickets) for comprehensive account views
- Get Company Properties: Retrieve all available company properties including custom fields for enhanced data access
Deal Management
- Create Deal: Add new sales opportunities with deal value, stage, pipeline, and custom property support
- Get Deal: Retrieve specific deals with comprehensive properties and UTC-formatted dates
- Update Deal: Modify deal properties including stage, amount, and custom fields
- Search Deals: Find deals using advanced filters including date ranges, amount ranges, pipeline, and stage with intelligent post-processing
- Get Deals: Retrieve deals with comprehensive pagination, filtering by pipeline and date, and optional rate limiting for large datasets
- Get Recent Deals: Access recently created or modified deals with sorting and filtering options
- Get Deal Pipelines: Retrieve all deal pipelines and their stages for workflow configuration
- Get Deal Notes: Access all notes associated with a deal for complete sales interaction history
- Get Deal Associations: Discover all related objects (contacts, companies, line items, quotes) for deal context
- Get Deal Properties: Retrieve all available deal properties including custom fields for advanced deal tracking
Ticket Management
- Get Recent Tickets: Retrieve recent support tickets with filtering by status, priority, and comprehensive pagination
- Get Ticket Conversation: Access complete conversation threads including all messages, notes, and replies with sender information
- Add Ticket Comment: Add comments to ticket conversations with public/private visibility control
Notes Management
- Create Note: Create new notes and associate them with contacts, companies, or deals simultaneously for comprehensive documentation
- Update Note: Modify existing note content and properties while preserving creation history
- Delete Note: Permanently remove notes from HubSpot with proper cleanup
- Get Contact Notes: Retrieve all notes for a specific contact with UTC timestamps and pagination
- Get Company Notes: Access all notes associated with a company for account documentation
- Get Deal Notes: Retrieve all notes for deals to track sales interactions and discussions
Lists and Segments Management
- Get Lists: Retrieve all available lists/segments with filtering by type (MANUAL, DYNAMIC, SNAPSHOT)
- Get List: Access detailed information about a specific list including filter definitions for dynamic lists
- Search Lists: Find lists by name and criteria with pagination support
- Get List Members: Export list members with complete contact information including names, emails, and custom properties
- Get List Memberships: Retrieve raw member IDs and timestamps for advanced use cases and bulk operations
Associations Management
- Get Contact Associations: Retrieve all associated objects for a contact (companies, deals, tickets, tasks, notes, emails, meetings, calls)
- Get Company Associations: Access all related objects for a company (contacts, deals, tickets, tasks, notes, emails)
- Get Deal Associations: Discover all associated objects for a deal (contacts, companies, tickets, line items, quotes)
Properties Discovery
- Get Contact Properties: Retrieve all available contact properties with metadata including custom fields, field types, and options
- Get Company Properties: Access all company properties including custom fields for enhanced data discovery
- Get Deal Properties: Retrieve all deal properties including custom fields for advanced deal management
Email Communications
- Get Contact Emails: Retrieve recent email conversations for contacts with subject, content, timestamps, and direction (incoming/outgoing)
Key features
Comprehensive CRM Automation
- Full CRUD operations across all major CRM modules (contacts, companies, deals, tickets, notes)
- Advanced relationship mapping with v4 Associations API for complete customer context
- Custom field support for all major objects with properties discovery capabilities
- UTC date handling for global operations and consistent timezone management
- Pagination support with intelligent rate limiting for large-scale data operations
Advanced Deal Pipeline Management
- Complete deal lifecycle management from creation to close
- Custom properties support for specialized business requirements
- Deal pipeline and stage retrieval for workflow configuration
- Advanced filtering by date ranges, amounts, pipelines, and stages
- UTC date formatting for closedate, last contacted, and sales activity timestamps
Notes and Engagement Tracking
- Create notes associated with multiple objects simultaneously (contact + company + deal)
- Complete notes management with create, update, delete, and retrieval operations
- Track engagement history across all CRM objects for comprehensive interaction records
- UTC timestamp conversion for accurate time tracking across global teams
Lists and Segmentation
- Access all list types: manual lists, dynamic lists, and snapshots
- Export list members with complete contact details for analysis and campaigns
- Pagination support for large lists (up to 10,000 members)
- Filter lists by processing type for targeted segmentation workflows
Common use cases
Automated Lead Management
- Capture contacts from multiple sources (website forms, marketing campaigns, referrals)
- Automatically create and associate contacts with companies for organizational tracking
- Add contacts to marketing lists based on qualification criteria and lead scoring
- Track email engagement and conversation history for lead nurturing workflows
Sales Pipeline Automation
- Automate deal creation from qualified leads and opportunities
- Progress deals through sales stages based on activities and milestones
- Add sales notes to deals documenting conversations, objections, and next steps
- Track deal associations to see all related contacts, companies, and activities
- Generate sales reports using custom deal properties and pipeline analytics
Customer Support Integration
- Create and manage support tickets with complete conversation threading
- Add notes to tickets documenting issue resolution and customer interactions
- Retrieve ticket conversations for quality assurance and training purposes
- Link tickets to contacts and companies for comprehensive customer support history
Account Management Workflows
- Create comprehensive company records with detailed business information
- Map organizational relationships using company associations to contacts and deals
- Document account strategy and business context in company notes
- Track account hierarchy and relationships for strategic account management
- Search companies by owner for territory and account assignment workflows
Marketing Automation and Lists
- Export marketing list members with complete contact details for campaign execution
- Create dynamic segmentation based on contact properties and behaviors
- Track list memberships and addition timestamps for engagement analysis
- Coordinate marketing campaigns across multiple lists and segments
Relationship Discovery and Mapping
- Use v4 Associations API to discover all relationships for any CRM object
- Map complex customer journeys across contacts, companies, deals, and activities
- Retrieve all emails, meetings, tasks, and notes associated with contacts
- Build complete customer profiles by aggregating data from multiple CRM objects
Custom Properties and Data Analysis
- Discover all custom properties for contacts, companies, and deals
- Access custom field values for specialized business intelligence and reporting
- Track custom metrics and KPIs specific to your business processes
- Export data with custom properties for external analysis and business intelligence tools
Disconnect the integration
Important: Disconnecting stops data synchronization but preserves existing data in both systems.
- Navigate to Your user profile -> Connections or Your workspace -> Manage workspace
- Find the HubSpot Integration
- Click Disconnect and confirm
Data Impact: Existing data remains unchanged in both systems, but sync stops and Autohive loses HubSpot API access.
Uninstall the app
From HubSpot: Follow the HubSpot Knowledge Base article on uninstalling connected apps